I’ve been running my blog on WordPress using Host Gator for almost ten years. While I have never had problems with my hosting provider, I have wanted to explore options to migrate to either Azure or AWS. I recently read about how AWS Lightsail would be the most affordable and simple option. I then looked for documentation to help me with the migration and ran into a lot of conflicting information. Hopefully, the issues and solutions detailed below will help others wishing to migrate their WordPress blog to AWS Lightsail.
Getting Started
I spent a lot of time looking for documentation on how to migrate my WordPress site to Lightsail. I found two articles to be the most helpful starting points. Both of them have some overlap, but together, they got me through the migration. The first, Migrate an existing WordPress blog to Amazon Lightsail, walks you through the steps of exporting your current WordPress site to your new Lightsail instance.
Note: There are other articles out there that advise using services or plugins that cost money. Do not use them. The abovementioned article walks you through migrating your data for free.
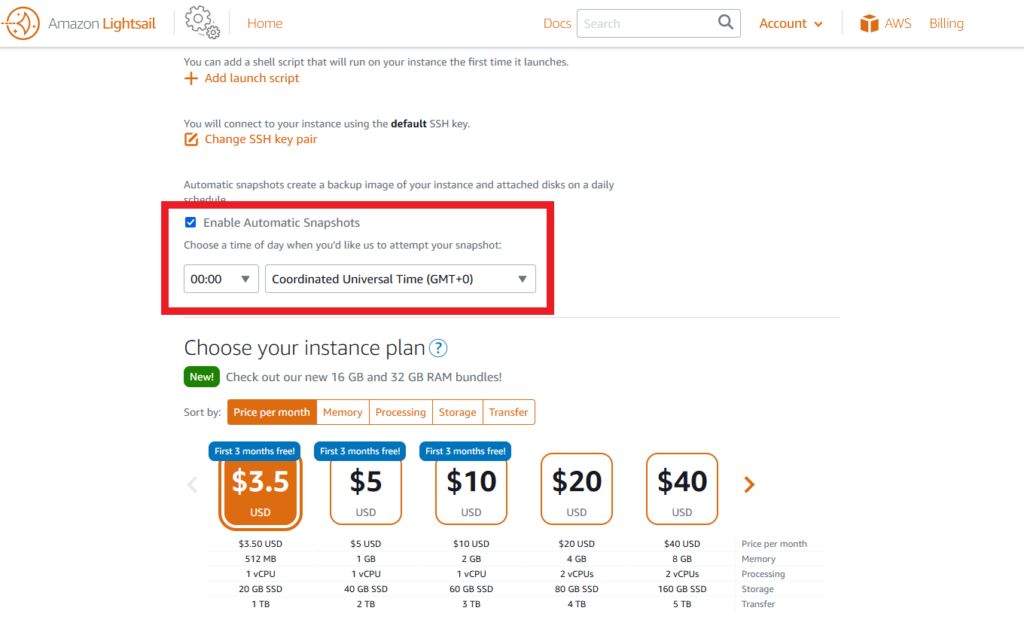
There are only three things that I would add to this documentation. First, I would recommend turning on automatic snapshotting during the creation of the instance.
The second is that I would recommend patience when doing the data import. The small XML file you download in the export phase only details what data to pull from your site. So, while uploading that file takes a few seconds, the actual data migration can take 10-20 minutes.
The third thing is that some things will need to be redone or cleaned up in this process. For example, in your new Lightsail instance, you must download the theme from your old site, reenter your site identity info, and clean up the sample pages and posts from your site.
Networking and Security
The second article, Quick Start Guide: WordPress on Amazon Lightsail, has a bit of overlap with the first but does a great job of addressing how to attach a static IP to your website (it is free, but you will be given a dynamic IP initially) and mapping a domain name to your website. The article provides a link to another article that goes into more detail about the DNS process.
The last thing that I needed help with was the SSL certificate process. The nice thing about Lightsail is that the SSL certificate you receive from Let’s Encrypt is free. What may discourage some is that it requires entering commands in the CLI to accomplish. However, I think that this article uses clear and simple steps to get your SSL certificate installed.
The only thing I ran into was that I ended up with a problem because my website showed up as insecure because of mixed content. I fixed this by using the Really Simple SSL WordPress plugin. I used the free version, which cleared up my issue with a few clicks.
Conclusion
I went through a lot of trial and error to migrate my website to AWS Lightsail. It is a pretty easy process that can save you a few dollars but, most importantly, help you gain a few new skills.
Learn how to set up a Dynamic DNS service with Cloudflare for free. Dynamic DNS allows you to update your DNS records automatically whenever your IP address changes, and Cloudflare makes it easy with its API. To start, create an API token with permission to edit DNS records and use a simple Bash script to update your DNS record with Cloudflare. The script is designed to run on your source machine and can be used to provide DDNS service from anywhere. With Cloudflare Dynamic DNS, you can use their CDN and security features to improve website performance and security.
Some Background
Dynamic DNS is used by many whose IP provider has given a dynamic IP address. While there are free services out there, it is typically a service that costs $25 a year. In this article, I will show you how to create your own script to manage dynamic DNS service using Cloudflare.
How it All Started
This all started with a Network Chuck video. For some background, I’ve been running NoIP as my dynamic DNS provider for several years. This, combined with port forwarding on my firewall, allowed me to VPN to my home network and RDP into my desktop PC while away from home.
This setup has worked for years, but the Network Chuck video highlighted the security issues surrounding punching holes in my network firewall. So, I followed his advice and the steps in his video to install a free Kemp load balancer and SSL offloader on my network. The Kemp load balancer acts as a reverse proxy, forwarding external requests to my internal resources, and SSL offloading ensures that my connections are secure.
While this was a great step forward regarding network security, it also meant that my dynamic DNS provider was no longer working. NoIP relies on a client-side application to periodically update your IP address with their DNS servers. Still, with the Kemp load balancer in place, I needed a more flexible solution.
Cloudflare Dynamic DNS
Enter Cloudflare Dynamic DNS. Cloudflare is a CDN and security company that offers a suite of services to improve website performance and security. One of their services is Dynamic DNS, which allows you to update your DNS records automatically when your IP address changes.
The best part? Cloudflare Dynamic DNS is completely free!
To get started, you must sign up for a Cloudflare account and create a new API token with permission to edit DNS records. Once you have your API token, you can update your DNS records using Cloudflare’s API.
Creating Your Dynamic DNS Script
To simplify things, I modified a simple Bash script that I found on GitHub that updates my DNS records with Cloudflare. Here’s the script:
#!/bin/bash

# A bash script to update Cloudflare DNS A records with the external IP of the source machine

# Proxy - uncomment and provide details if using a proxy
# export https_proxy=http://<proxyuser>:<proxypassword>@<proxyip>:<proxyport>

# Cloudflare zone is the zone which holds the records
zone="example.com"

# DNS records to be updated
dnsrecords=(vpn.example.com vcenter.example.com desktop.example.com www.example.com example.com)

# Flag for Cloudflare proxy status (true or false, lower case in script logic, correctly formatted in JSON payload)
use_proxy=true

# Cloudflare authentication details file path
cloudflare_auth_file="./cloudflare_auth_key.txt"

# Get the Cloudflare authentication key from the file
cloudflare_auth_key=$(cat "$cloudflare_auth_file")

# Get the current external IP address
current_ip=$(curl -s -X GET https://checkip.amazonaws.com)

echo "Current IP is $current_ip"

# Loop through the DNS records and update if necessary
for dnsrecord in "${dnsrecords[@]}"; do
    cloudflare_zone_id=$(curl -s -X GET "https://api.cloudflare.com/client/v4/zones?name=$zone&status=active" \
      -H "Authorization: Bearer $cloudflare_auth_key" \
      -H "Content-Type: application/json" | jq -r '.result[0].id')

    cloudflare_dnsrecord=$(curl -s -X GET "https://api.cloudflare.com/client/v4/zones/$cloudflare_zone_id/dns_records?type=A&name=$dnsrecord" \
      -H "Authorization: Bearer $cloudflare_auth_key" \
      -H "Content-Type: application/json")

    cloudflare_dnsrecord_ip=$(echo $cloudflare_dnsrecord | jq -r '.result[0].content')
    cloudflare_dnsrecord_proxied=$(echo $cloudflare_dnsrecord | jq -r '.result[0].proxied')

    if [[ "$current_ip" == "$cloudflare_dnsrecord_ip" ]] && { [[ "$use_proxy" == true ]] && [[ "$cloudflare_dnsrecord_proxied" == true ]] || [[ "$use_proxy" == false ]] && [[ "$cloudflare_dnsrecord_proxied" == false ]]; }; then
        echo "$dnsrecord DNS record is up to date"
    else
        cloudflare_dnsrecord_id=$(echo $cloudflare_dnsrecord | jq -r '.result[0].id')
        # Update the record
        update_response=$(curl -s -X PUT "https://api.cloudflare.com/client/v4/zones/$cloudflare_zone_id/dns_records/$cloudflare_dnsrecord_id" \
          -H "Authorization: Bearer $cloudflare_auth_key" \
          -H "Content-Type: application/json" \
          --data "{\"type\":\"A\",\"name\":\"$dnsrecord\",\"content\":\"$current_ip\",\"ttl\":1,\"proxied\":$use_proxy}")
        echo "$dnsrecord DNS record has been updated with the current IP: $current_ip"
    fi
done
To use this script, replace the example.com variable with your own values.
Save the script to a file (e.g. cloudflare-ddns.sh) and make it executable with
chmod +x cloudflare-ddns.sh.
Also, the script reads the Cloudflare API key from a file named cloudflare_auth_key.txt . This is easy enough to create using nano. nano cloudflare_auth_key.txt will create the file. Then, copy and paste the key into the file and save it.
Finally, set up a cron job to run the script periodically (e.g., every 10 minutes) to ensure that your DNS records are always up to date. Here’s an example cron job:
And that’s it! You can create your own dynamic DNS service using Cloudflare for free with a few simple steps. This will ensure that your DNS records are always up to date, even when your IP address changes.
By using Cloudflare Dynamic DNS, you can also take advantage of Cloudflare’s CDN and security features to improve website performance and security. And best of all, you don’t have to worry about the security risks of opening up your network firewall.
I recently took the VCP-NV 2023 exam, also referred to as 2V0-41.20. The platform has been completely rebuilt since I took the VCP6-NV exam in 2018. I want to share some of the resources I used and hopefully help someone else to take and pass the exam.
Pluralsight
There is a Pluralsight course called: VCP-NV 2022: VMware Certified Professional – Network Virtualization (2V0-41.20). This course goes through many concepts and then has labs you can follow along with. Watching the approximately eight hours of content was very helpful for me because although I understood many of the networking concepts, I needed to know how things were done differently in NSX-T.
Hands On Labs
If you do not have a lab or maybe you don’t have the storage and compute resources necessary in your home lab to run a full NSX implementation, I would highly suggest using VMware Hands On Labs. It’s free and it is a great way to learn.
Using Your Home lab
I spent quite a bit of time messing with NSX in my home lab. This is one of the best ways for me to learn. I even found a way to install NSX from vCenter that was not mentioned in the videos on Pluralsight. The things I learned were a little bit less about helping me with the exam and more about understanding how things would work in a production environment.
Practice Exams
Unfortunately, I was unable to find any practice exams. What I had to do was make notes around everything listed in the exam guide. Also took a look at some resources, like this one from vBrownBag on YouTube to prepare me for the exam. The one I linked is for the 2.4 version of NSX-T, but I found a lot of the concepts to be the same.
Conclusion
These are the tools that I found invaluable in helping me learn the material needed to pass this exam. I hope that they can be of service to you as well.
Early last year I ran into an issue where we needed to move virtual machines from ESXi 5.5 to Azure. Although the support matrix said that both vSphere 5.5 and Windows 2003 were supported by the migration tool, we could successfully migrate the VM using the migration tool as I demonstrated in an earlier post.
What we ended up doing instead was using Veeam to migrate the VM to Azure. I had heard of this from a Veeam rep at a conference a few years prior, but until that point, I never had a use case for that information. Below I will demonstrate how to migrate a VM from vSphere 7 to Microsoft Azure using the Veeam restore feature. In this example, I’m using a Server 2022 VM, but it will work similarly for any Windows VM.
Prerequisites
An existing Azure subscription
Azure Storage Account
A backup of the VM you would like to migrate (with RDP enabled)
An existing network security group with an inbound rule allowing RDP
Step 1: Ready the Veeam Environment
The first thing we will need to do is ready the Veeam environment. The way we do this is a little counterintuitive. We will start by clicking Restore in the home ribbon in Veeam.
Then we will choose “Restore from Backup”.
Next, we will choose “Entire VM Restore”.
Then select “Restore to Public Cloud”
Finally, click on “Restore to Microsoft Azure”
Now that you have navigated through the menus above, you will be presented with a menu asking you to perform the initial configuration. Click “Yes”.
The initial configuration screen is of no consequence. Just click “Next”
The next screen is where you will choose the deployment type. The choices are between the Gov, China, and Global Azure accounts. The default is fine. Click “Next”.
The next screen will allow you to add new Azure credentials or use an existing one. If you choose to add new credentials, which I have chosen to do here, you will likely see the error message displayed below. Veeam uses Azure PowerShell to connect to Azure and the wizard will prompt you to install Azure PowerShell. This is an easy process because the link given will help you install Azure PowerShell in a few clicks.
Note: The language in the screen below is a bit imprecise. “Create a new account” does not actually create a new account. It simply configures existing Azure credentials and saves them to Veeam.
With the installation finished you are now prompted to enter your Azure credentials.
Step 2: Perform the Restore
The wizard will ask you to add a VM to be restored. I have chosen to restore from a backup as you see below.
Note: Your VM should have RDP and DHCP enabled. If not, you will not be able to connect to the machine once it is restored.
Next, you will choose the region where the VM will be restored to. Remember that this region must be the same as your storage account.
Now, you must choose the VM size and the storage account. This is a good opportunity to resize the VM if it was previously too large.
Next, you’re given the opportunity to place the VM in an existing resource group or to create a new resource group.
Now, you’re able to choose the network and network security group.
Note: I chose to assign a public IP for testing purposes. But normally, you would have either an express route or a VPN from on-prem.
The last item to configure is whether or not to scan the restored VM for malware prior to recovery. I chose not to do this because my VM is a fresh install of Server 2022.
Finally, the restoration will start and you will be able to watch the progress similar to the screen below.
Step 3: Verifying the VM Restoration
Once your VM has completed its restoration process, you’ll want to make sure that you can connect to it. First, you will need to navigate to the resource in Azure, click “Connect” and download the RDP file.
You should be able to open the RDP file and connect directly to the VM.
Conclusion
Using Veeam restore to migrate VMs to the cloud can be a great alternative to using the Azure Migration tool.
I recently took and passed the AZ-305 exam. I wanted to share some of the resources I used so that they may help someone else take and pass this exam. I took the AZ-104 exam four months before and felt there was a natural progression, but the AZ-305 was much more difficult.
Free Microsoft Resources
There are three resources from Microsoft that I found helpful in studying for this exam. First is the Microsoft Learn portal. It has tons of modules to browse through, especially if you only need help with certain concepts. Second, there is the lab material on GitHub. Third, is the study guide, which gives you an outline of what topics you should fully understand in order to pass the exam.
John Savill’s Technical Training on YouTube
Just as I did in studying for the AZ-104 exam, I relied heavily on John Savill’s videos on YouTube. Specifically, the AZ-305 playlist and the AZ-305 study cram video. These videos were crucial for me to better understand what I had read.
Playing Around in the Azure Environment
Just like with my AZ-104 exam preparation, I cannot overstate how important it is to actually play around in Azure. Create a VM. Create a resource group. Peer a network. All of these things were very important for me to understand how the different services interact.
Using the Official Practice Test from MeasureUp
Once I felt that I had mastered all the concepts, I turned to the official practice test from MeasureUp to ensure that I had a feel for what type of questions would be asked. This helped me bring everything I learned together.
Conclusion
These are the tools that I found invaluable in helping me learn the material needed to pass this exam. I hope that they can be of service to you as well.
When I took the Azure AZ-104 exam in August, I was able to pass confidently because I used the following resources. I hope that if you’re studying for the exam, you find the same resources helpful.
Exam Ref AZ-104 Microsoft Azure Administrator
I actually bought and read the physical copy of the exam reference guide from Microsoft. I took it with me everywhere for about a month. Anytime I had to wait for anything, I started reading the book. This helped me build a framework for understanding the various concept the exam covers.
Playing Around in the Azure Environment
I cannot overstate how important it is to actually play around in Azure. Create a VM. Create a resource group. Peer a network. All of these things were very important for me to understand how the different services interact.
John Savill’s Technical Training on YouTube
John Savill’s AZ-104 playlist and study cram video were very instrumental in helping me pull all the concepts together. It is amazing that all his content is available on YouTube for free.
Using Tutorials Dojo Practice Exams
The Tutorials Dojo practice exams helped me bring all the concepts together. The questions were similar in concept to what was in the exam, but crucially, they were not brain dumps. The reason I like practice exams is that I learn to think a little more critically about scenarios that I may experience in real life.
Conclusion
These tools helped me study for and pass the exam. I hope that they help you along in your Azure certification journey.
I have been running a VMware home lab with an old Dell PowerEdge R720 with ESXi 7.0.2 installed. I have been running Azure for backups and Key Vault to protect secrets, but now I want to migrate one of my vSphere on-prem VMs. Through this process, I ran into a few issues and “gotchas” that may affect other users. Below is my list of potential issues you may face and how to resolve them.
A Note About Whether or Not to Use the Migration Appliance
I started out choosing to use the migration appliance. I downloaded the OVA and installed it in my lab environment. This initially turned out to be a huge hog of resources without any real benefit for my small lab environment. For that reason, when my project would not allow me to add the migration tool and I had to create a new project, I decided to go with the PowerShell script install on an existing server. If you decide to do the same, remember that you must use a Windows Server OS.
Issue 1: Azure Migration Project Tool Will Not Add to Your Dashboard
This was a random issue. Your Azure Migrate project has access to the free assessment tool and the free migration tool. A functioning project should look like the image below.
A functioning project with the migration tool added
But the first interaction of my project would not allow me to add that tool. I searched the message boards and could not find a solution to my problem. So, I did the next best thing and started a new project.
Issue 2: The x86 version of VC++ Redist 2019 may cause the gateway service to fail
This issue is specific to using the PowerShell version instead of the virtual appliance. This was a problem for me because I had both the x86 and x64 versions of VC++ Redist 2019 installed on my Server VM as shown below.
I searched for the problem on the internet and found this post in Microsoft’s forum. The advice given was to uninstall both versions, but in my case, that just caused another issue. The solution that worked best for me was to only uninstall the x86 version. Once done, the installation was completed successfully.
Issue 3: Insufficient Cores Available in the Subscription (During the migration prechecks)
I worked my way through all the other issues and then ran into this one.
I had enough cores available in the normal compute SKUs, so this one confused me a bit. The issue, in this case, is that I did an assessment, and used the assessment settings to determine the compute SKU I was going to use but did not properly modify the settings in my assessment. Once I removed reserved instances from my assessment and recalculated the assessment, I got a normal compute SKU and was able to complete my migration successfully.
Conclusion
While the Azure Migrate tool may not be as easy to use as some of the paid tools, it can be very useful if you are cost-constrained.
To create a key vault, you must log in to the Azure portal and search for “key vault”. Once done, you will see the above screen. Click “Create Key Vault” to continue.
In the above screen, you are asked to choose a resource group or create one. Again, in this case, I chose to create a new resource group. Then you are asked to create a unique key vault name and choose a region, and pricing tier. I chose the East US region and the standard pricing tier. There is no need to use the premium tier in this case. Once your choices are made, click “Review + Create” to create the key vault.
Step 2: Add Secret to Vault
Once the key vault has been deployed, click “Secrets” from the menu on the left side of the screen.
Now you can add the recovery services vault secret (or any secret for that matter) to the Key Vault. Be sure to label it something that makes sense and click “Create”
Finally, you should be able to see your secret in the recovery services vault.
Conclusion
This is a really simple way to start working with Azure Key Vault. Now you have your secret saved in a location that is not easily compromised or exposed to failure as your home PC.
Over the past few months, I have built a new PC, a home lab, and an Azure environment. Over the next few weeks, I will work to better integrate all three. One of the first steps in this process is setting up Azure Backup for my Windows 11 PC.
Prerequisites
An existing Azure subscription
A Windows PC
Step 1: Create a Recovery Services Vault in the Azure Portal
Login to your azure portal and search for the “Recovery Services Vault”. If you do not have a recovery services vault, you will create one here.
From there you are taken through a wizard to create the Recovery Services Vault. Here you will need to either choose an existing resource group or create a new one. I decided to create a new one because all my resource groups contain related items that can be deleted together. Additionally, you are asked to choose a unique name for the Recovery Services Vault. Once these two things are done, you can click “Review + Create”, and in a few moments, the Recovery Services Vault will be created.
Once your Recovery Services Vault has been created, you can click on the resource and see a menu on the left side. From that menu, you will click Backup. Then you have two choices to make: “Where is the workload running?” and “What do you want to backup?” In my setup, I chose “On-Premises” and “Files and Folders”. Note that it is currently not possible to back up the system state for Windows 11 machines.
Once you click the “Prepare Infrastructure” button, you’ll be brought to the above screen. At this point, is important that you both download the Azure Recovery Services Agent and MOST IMPORTANTLY, the vault credentials. In this example, I am saving the vault credentials to my desktop, but they can and should be saved to Azure Key Vault.
Step 2: Install the Azure Recovery Services Agent
You’ll first need to download the Azure recovery services agent from the previous screen.
The install screen for the Azure recovery services agent should look like the one above.
The Installation will need .Net Framework 4.5 and Windows Powershell. You will need to install these items to proceed with the installation.
As shown in the above screen, this is where you will use the saved vault credentials from the earlier step.
Next, you will be asked to enter a passphrase and a location to save it. You can use your own passphrase generator, but I found it easier to use the passphrase generator provided here. You may also save the passphrase on your local machine as I did here. Once done, click Finish to complete the installation.
Step 3: Configure Your Backup Settings
Now that the installation has finished, you will be able to schedule your first backup.
Open the Azure Backup client on your PC and click “Schedule Backup” on the right side of the screen.
From the screen, as shown above, you will choose which drives you will backup.
You also have the option to exclude some folders and files.
You can specify the times of the backup up to three times a day.
Here you can choose the retention schedule. Initially, I was given what I believed was too many restore points, I adjusted mine accordingly as you can see above.
This is one of the final screens. You are given the choice to send the data online or offline by sending the disks directly to Azure. I chose to send my data online. After this screen, you will click next a few more times and then you are ready to start your first backup at the scheduled time.
Once my download has started, I can verify it is working from the Azure Backup App.
I can also go to my Recovery Services Vault, click the Backup Dashboard, and verify that the job is running.
Conclusion
While there are other ways to backup a PC, this is one of the better ways to get started working with Azure backups and Site Recovery.
Digital Transformation is a term that has been used frequently in IT discussions
We live in an era where digital technologies are expanding exponentially, and digital transformation is reshaping the business landscape globally. Digital Transformation is a term that has been employed often in IT discussions during the last decade. This is especially true for Fortune 1000 companies in the developed world. However, there are still many places where this transformation has not yet taken root.
So, what does digital transformation precisely entail? In its simplest form, Digital transformation is taking manual, usually paper-based workflows, and digitizing them. Thereby, making them more robust and accessible. An example is electronically filing tax returns.
This form of digital transformation makes things simpler for the end-users. This way, the end-users or customers can comfortably finish their tax procedures from the solace of their homes and avoid going to the post office.
Additionally, this digital transformation is linking every person, community, and government agency within a nation. This is particularly transformative in countries where government services have had a more challenging time penetrating beyond urban areas. Also, with digitization, even the most remote parts of Guyana can be connected and fully integrated with its central city hubs, the Caribbean, and beyond.
In collaboration with the Inter-American Development Bank, the Guyanese Government engaged the Estonian Government to help develop a “Digital Governance Roadmap for the Govt of Guyana”. Estonia is ranked first among 193 countries in the United Nations E-governance index and is considered the most advanced digital society globally.
This Digital Roadmap Report focuses on evaluating existing legislation and implementing suggestions for eGovernment related legislative changes, electronic identification for all citizens, improving data quality and digitization of data, development for technological solutions for health, school, and police systems, planning and implementation of connectivity and broadband access and development of cybersecurity strategies.
In January 2021, Guyana had a population of 733.4 thousand, of which 294.3 thousand were internet users, i.e., internet penetration of 37.3% as opposed to 92.5% in the United Kingdom and 87.3% in the United States. Also, most African countries have an internet penetration of 55-60%.
However, in Guyana, there are still many areas that are ripe for digital transformation. Presently, one of the most prominent roadblocks to growth and digital transformation is the people’s hesitation in switching from conventional methods to digital ones due to privacy concerns. Moreover, people still have a misconception about digital transformation that anything stored on a digital device is prone to undue exploitation.
Hence, the initial step in getting the public to embrace digitization or digital transformation is to build a sense of trust. People need to feel confident that their data is being used appropriately while being stored and shared securely. Once a positive digital mindset gets developed and individuals see how it benefits their lives, there will be no turning back.
Also, a digital economy can reduce Guyana’s dependency on external goods and services if they choose to become the innovators and developers of the Caribbean region. To accomplish this, all Guyanese in urban and rural areas require direct access to transformative technologies and digital information.
As David Granger rightly said, the modern world has educated children who study in smart classrooms with whiteboards and projectors and use tablets for taking and storing their notes. This way, a professor can train two classrooms together– one in Karasabai in the Rupununi and the other one in Corriverton on the Corentyne, and this is what digitization is.
In addition, with digital transformation, a patient in Hopetown can transfer medical examination reports for analysis across long miles or consult with a specialist in Georgetown. Furthermore, with e-payments, you can shop at the grocery store with a tap on your phone and get take-out delivered to your doorstep within minutes.
Similarly, e-Governance eliminates the requirement to travel out of your hometown for accessing legal services, acquire passports, examine academic or medical records, register business, renew licenses, or file tax returns.
Apart from this, Guyana, is now progressing towards becoming a digital state. This digital state will apply Information and Communication Technology to add value to their manufacturing and service sectors and boost economic and digital transformation. This is especially important considering Guyana’s relatively recent entry into the Oil and Gas sector.
It will generate knowledge-based businesses, move the economy away from over-dependence on principal production, move manufacturing up the price chain to penetrate larger outside markets. Also, the digital transformation in Guyana can deploy Information and Communication Technology efficiently to foster competitiveness and productivity.
It is the implementation of technology that will promote innovation and eventually lead to economic growth. The digital state will then be capable of delivering quality public assistance across the nation.
This will additionally reduce the requirement for residents to move outside of their areas of residence to access various statutory services. They may not be able to examine their educational and medical records, register companies, and embark on business and investment enterprises in the years to come.
Moreover, the planned and in-progress developments in the Information and Communication Technology sector enable people to meet the digital divide between the hinterland and coast, Guyana, and the rest of the Caribbean.
This is because broadband access is getting rolled out to isolated rural areas to foster greater integration of the nation. Therefore, this expanded broadband access intends to present cost-competitive connectivity alternatives and to help to enhance access and the offering of public services.
Likewise, broadband access has spread to almost 116 government bureaus and departments, nine student hostels and dormitories, and three nursing establishments to enhance resident engagement and foster embodiment and social advancement.
It will also encourage comprehensive incorporation and innovation to provide data services and digital industries compatible with the Green State Development Strategy.
Hence, we can say that this shift towards digital modes from traditional paper operations will make Guyanese daily lives easier and enable Guyana to widen its reach to explore new opportunities.
It will also make it more comfortable for people to access public services as the government facilitates investment, commerce, and trade and will help people take a step ahead in the direction of digital transformation.